So this will be the beginning of my first Project Series. The name of this project is the Aquatotter, and I will put the project guidelines in my next post. It is generally a floating boat/raft/thingy that is supposed to be able to float on the water, exchange crews, and go back to the dock. We are supposed to use mainly Reclaimed materials, like plastic bottles, cardboard, found wood, or anything generally that we didn't pay for. I think this is going to be a fun project, and I'm bursting at the seams with ideas already.
Here's a link to previous year's Aquatotter adventures.
The first portion of the project, the anchor has been completed, and I shall have pictures up of the final thing in a couple of days. It went pretty well, and I believe our anchor fulfills all of the criteria established by the professor. Here are pictures of the original design which contained the initials of all the people who were in our group at the time. For the record,
my group currently consists of RM (me), TC, RB, and EC. Since TC was a later addition to our group his initials didn't get on the anchor, but he helped with the lab report, so it's all good.
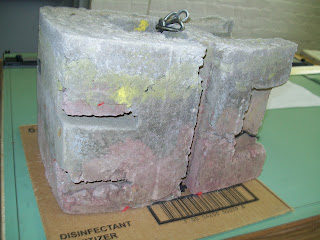
I did the anchor design in Google Sketchup. The anchor came out a bit rounded on the sides because of expansion, but otherwise came out as designed. We added fabric in between the layers of concrete for reinforcement, and a chain was added to pull it up by. There is also a hole in the center in case the chain breaks. Yellow and Red paint were used as colorant as well as red yarn. We emptied the whole bottle of yellow paint and the cement was eating it like m&ms but it showed up in the end, ditto with the red.
The R, with the chain coming out for securing and hoisting the anchor. There's also the hole in the center in case the chain breaks.
One of my group members giving an idea of scale.
The black stuff is the fabric reinforcement that we used. We were happy that we saw some color differentiation at the end of the day, because the cement was straight gray last time we saw it. You can see bits of the red and yellow paints we put in there.
The E/M & C, which came out pretty well considering that part of the E/M support collapsed while we were putting the cement in. More color visibility from this side.
Finally the B shape, where you can see the red yarn we put in. It turned out looking like red veins, which was an unexpected bonus.
So all in all, our anchor was a success. Its definitely heavy enough for the project requirements, the color is visible and we have 2 things to secure it with (the chain and the hole) when we get out on the water. And its light enough for one person to carry. Here's one of my group members describing our anchor.
I went to Ben Franklin's Art Supply mentioned in my
earlier blog to grab some supplies for the coming project. It was a short trip, I only bought wax candles for sealing the plastic bottles we are collecting and some sketch paper for a different project. I went to 7 eleven afterward to get a pack of matches. You can get a whole lot for $1.19. My next post will be about the plastic bottles and the sealing process. Stay tuned.


