The interview was over 30 minutes long, so I decided to break it into parts for easy viewing. The volume isn't very good at the beginning, but it gets better as you go along. I conducted the interview inside the William H. Moses Jr. Architecture Library on Hampton University's campus. Thanks for watching!
Showing posts with label Bemis. Show all posts
Showing posts with label Bemis. Show all posts
Tuesday, December 4, 2012
Dr. Sanchez-Del-Valle Interview Part 1
Before Thanksgiving break, I got a chance to sit down and speak with Dr. Carmina Sanchez-Del-Valle, who has been teaching at Hampton University since 1997. She is the recipient of many awards for both her design and for teaching excellence. She received both her Bachelor's of Environmental Design and her Master of Architecture at the University of Puerto Rico in 1980 and 1983, respectively. She obtained her doctoral degree in architecture from the University of Michigan in 1991.
The interview was over 30 minutes long, so I decided to break it into parts for easy viewing. The volume isn't very good at the beginning, but it gets better as you go along. I conducted the interview inside the William H. Moses Jr. Architecture Library on Hampton University's campus. Thanks for watching!
The interview was over 30 minutes long, so I decided to break it into parts for easy viewing. The volume isn't very good at the beginning, but it gets better as you go along. I conducted the interview inside the William H. Moses Jr. Architecture Library on Hampton University's campus. Thanks for watching!

Monday, November 12, 2012
Spring 2013 Wishlist:10 Things I Need In My Studio
1. Electric Eraser
We've all been there. Smears, tears, and blurs all over your beautiful project. As architects move further and further from drawn media, and into printed media, we might feel as if erasers are obsolete. This couldn't be further from the truth. Most people would agree that kneaded erasers produce some of the best results, but unfortunately because of their shape, make it difficult to be precise with your erasing.
 |
| Alvin & Co. SE2000 Sakura Electric Eraser |


Possibly the worst fate to befall your projects after they're complete? Ripping, tearing, shoe marks, folds, and smears due to insufficient protection. Simply rubber banding might seem like the solution, but when you take them off your paper, they can sometimes cause more damage than leaving it alone. Enter the drawing tube. Portability, Safety, Water-proof-ness (possibly not a word), and Simplicity.
If you're worried that it'll make finding the drawing difficult, you can just get some regular scotch tape, write the drawing name on it twice, and tape it making a tab that sticks out from your drawing, so that you can easily read it without taking out the whole roll. Color-coding is doable as well.

It's the day before the final project, the library is closed and all the light tables are full. How do you put your intricate floor plan on your presentation paper now while you still have time, and no access to a printer? Oh wait, never mind you have a light box. I have been on a mission to make one myself, and as soon as I do, I promise I will post the tutorial. In the meantime, you can buy one from here.

A fairly consistent mistake in studio, in all the rush to finish our projects, is forgetting to put on a north arrow. It is a basic requirement, learned in first year, but frequently overlooked until the last minute, and then scrawled on with a pen before your professor can look at it. With this template, your professor never needs to be able to tell that you forgot, delivering perfect and professional arrows every time.

7. Drafting Chair
Many of us in studio have dealt with the stool forr several years. It offers no back support, numbs your legs, and is usually not adjustable. Behold! The drafting chair! Back support! Cushioned seats! Adjustability!
You can find many different varieties online, but this particular model makes the top of my wishlist.
Great things include optional armrests, orthopedic spine support, and upholstered seats.

These little things are useful both in studio or in your room, for gathering your cables and not having them lie in a tangled mess on your table or on the floor. My favorites so far are the Cable Monkey which is adorable and functional, and the Cordies Cable Organizers which are functional and simple to use. Either one is a match made in heaven.


Give your project a bit of spice, and as a plus, you will always know which pushpins are yours. These pushpins have 2 pins per ninja star, for extra reinforcement, which is great for bigger or heavier presentation boards.

10. USB Toast Handwarmers
You might think these are not a neccesity, but that makes me think that maybe you are not an architecture major at all, and possibly a business administration major here to spy for the other side. Picture yourself in studio, in winter, in the middle of the ngiht. Every square inch of you is bundled up except for your hands, which you need to type. Though your body is warm, your hands are freezing and becoming more and more useless and ice-like every hour.
Solution? Handwarmers! They plug into your laptop, which is already beng heavily taxed, so a little bit more won't hurt it. And as a bonus, you can type with them! And as a double double bonus, they are ridiculously adorable.

Friday, November 9, 2012
Design+Innovation: Menchville House Project
Today, I'm continuing to post about our project at Menchville House. Last week, we got together and combined the best parts of our individual designs, and created 2 separate group designs. Some of the positives from my design were the innovative material (100% recycled PET plastic felt), the color, and the mobility. The final design was mainly based on one team members design with addition of elements from everybody else's designs.
Here are our final presentation boards from that group's design solution.
Click on a picture to expand. Enjoy!
 |
| Title and Description page |
 |
| Design Process |
 |
| Floor Plan and Construction Details |
 |
| Sections and Elevations |
 |
| Interaction Page |
Tuesday, July 31, 2012
All-Nighter Made Easy
As designers and architects, something integral to the school experience is the all-nighter. We wear the grogginess, dark circles, and the hours we've spent working as badges of honor among our peers and those of other majors. The night is spent eating snacks, sodas, and trips to Taco Bell or 7-Eleven. At the end of the day/morning we compare notes on how much sleep we actually managed to get.

But anyone can see that this lifestyle is far from healthy, causing us to barely be functional for the rest of the morning classes and possibly missing our afternoon class trying to reclaim the lost hours. Hunger pangs cause us to lose time, walking to the Chinese restaurant or taking a trip to Walmart, and even more precious, money. We are coming out the losers academically, nutritionally, financially, and medically. Sleep deprivation has been linked to obesity, psychosis, bipolar disorders, impairment of abilities, attentiveness, and memory.
So what can we do about it? The work isn't going to do itself, and we all know that getting something done is better than coming in empty handed. The best things that can be done are to try to eat healthier foods, stay focused, and most important, not fall asleep. I have searched the interweb to bring you a compilation of the best tips for a successful all-nighter.
Food

But anyone can see that this lifestyle is far from healthy, causing us to barely be functional for the rest of the morning classes and possibly missing our afternoon class trying to reclaim the lost hours. Hunger pangs cause us to lose time, walking to the Chinese restaurant or taking a trip to Walmart, and even more precious, money. We are coming out the losers academically, nutritionally, financially, and medically. Sleep deprivation has been linked to obesity, psychosis, bipolar disorders, impairment of abilities, attentiveness, and memory.
So what can we do about it? The work isn't going to do itself, and we all know that getting something done is better than coming in empty handed. The best things that can be done are to try to eat healthier foods, stay focused, and most important, not fall asleep. I have searched the interweb to bring you a compilation of the best tips for a successful all-nighter.
Food
- The number one tip I have as far as food is to plan in advance! Save yourself a midnight trip to Walmart or 7-Eleven. We are all vulnerable to impulse buys, and we are probably extra weak when we've been up 19 hours straight. You also waste productive work time, driving to the store, shopping, and unloading the bags afterward. To simplify the process, buy in advance and keep your desk stocked for when the cravings hit.
- Drink alooot of water. The brain is 70% water and you're going to need every grey cell for doing your project and the review afterward. There are two approaches for this; keep a water bottle at your desk at all times, or buy bottled water at the store. I know buying bottled is bad for the environment, but not everyone is comfortable drinking from school water fountains. Stay hydrated, whichever approach you take. Water is great for quenching thirst and prevents the sugar crashes that can come from drinking sugary beverages.
- Ordering out is an option, but keep in mind that most restaurants close from 9pm to 11pm, so don't be disappointed when you realize that Dominoes won't deliver at 1 am. Also, keep in mind that others will smell the food, and want a piece. If you don't mind sharing, that's cool, just make sure there's enough left over for yourself.
- Clear away all distractions! Close the YouTube page, clean your desk, and kick out your friends. Distractions are to projects what nuclear bombs are to everything. At the end of the day, you will be counting the hours that you wasted in your head, and imagining how that 30 minutes on Facebook could have been used to help you reach your deadline more quickly.
- Blocker programs can block you out of specific sites to make sure you stay focused on your work. Some programs can lock you out of the internet completely.
- Lists are your friends. They let you know what you have accomplished, and what you need to finish. Tasks seem less daunting once you beak them down into their parts and you can feel a sense of accomplishment with each finished task that can help you keep going throughout the night.
- Don't sleep. Don't do it. It is the worst mistake you can ever make. Unless you go to sleep at 7pm and intend to wake up at 6am, you will not wake up on-time without setting 5 alarms. Do not go to sleep at 2am expecting to wake up at 7am to finish your project. Your body does not work that way.
- Make an energizing playlist on your iPod. Search your music library and find the most exciting music possible, or just pick your favorites that you know you will sing along to as soon as you hear them. In some studios, headphones are required, but if you are in studio by yourself, for the most part, nobody will mind if you play it loud. However, in the library, headphones are a must at all times.
I hope these tips have helped you out. Let me know in the comments your stay awake tricks!
Tuesday, July 19, 2011
Discovering Richmond Part 2
For the second part of my Discovering Richmond series, I'm taking you to the other side of town. Shockoe Bottom is one of the oldest parts of Richmond, having been the center and starting point for slaves in the South. Slave markets, jails, and auction houses were all here once upon a time. There is so much history here that I could spend this entire blog on just that subject, so to save time, I'll just send you here instead.
As an African American living in this particular District, I sometimes don't know how to feel, walking the same cobblestones as my people did hundreds of years ago. I know I said in my very first blog post that I would try to maintain objectivity as much as possible, so maybe I should leave emotions out of it. In any case, here are my photos, documenting my walk down Cary St. in Shockoe Bottom.


As an African American living in this particular District, I sometimes don't know how to feel, walking the same cobblestones as my people did hundreds of years ago. I know I said in my very first blog post that I would try to maintain objectivity as much as possible, so maybe I should leave emotions out of it. In any case, here are my photos, documenting my walk down Cary St. in Shockoe Bottom.
 |
| One of the many former tobacco houses on Cary St. that were converted into residential apartments. This particular one also contains a pool with a waterfall, an upscale Italian restaurant, and a gym. |
 |
| All the other River Lofts on Tobacco Row and the Holocaust museum much farther down. We'll see pictures of that later on. |


 |
| Nicest set of mushrooms I've ever seen, have nothing to do with architecture, but from a photography perspective, too perfect to pass up. |
 |
| I was fascinated by the brick detail on this building. |
 |
| The CSX train that I can hear screeching by at this very moment in time. Weird coincidence. |
 |
| This particular train was only 2 cars long. |
 |
| Virginia Holocaust Museum. I've never been inside personally, but I hear its a one of a kind experience. |

 |
| The unopened (and to my knowledge, never opened) windows of the Virginia Holocaust Museum |
 |
| One of the train cars I'm assuming they used to carry Jews in. |
 |
| The Richmond VA flood wall. Funny story about this wall, when the flood finally came, the city sewers backed up so the water was trapped on the wrong side. |
 |
| Believe it or not, these rocks were completely untouced, I was just lucky enough to find them this way. |

 |
| Those little spots of greenery that brighten up my day. |
 |
| One of the more interesting street facades I've seen. I don't think this building would be half as interesting if the windows were all the same. Its worth looking into for future projects. |
 |
| If anyone knows the purpose or practice of this "technique" please let me know in the comments. |
 |
| The ceiling at Urban Farmhouse, one of the main, organic/green/fair trade restaurants in Richmond . |
 |
| Urban Farmhouse interior. It reminds me a great deal of Busboys & Poets in DC, with their couches and laid-back feel. The setup is also similar to Globe Hopper, located a couple blocks down, on Main Street. |
 |
| Urban Farmhouse wine selection. |
Saturday, June 25, 2011
Second Year Final Review
When I wasn't busy explaining my project, I was busy taking pictures. We had a pretty good turn out this year, and lots of people had some really awesome projects. There were teachers, students, family, and outside architects, and of course, refreshments (aka No. 1 reason to come to review)!


Professor Turner showing someone what they did wrong.

Mr. Bowen, looking very dapper.

Mr. Ford III giving his opinion.

Mr. Scott looking at someone else's work.

Chad discussing his and Taabitha's joint presentation

Professor Kloster and Mr. Bowen watching Chad's presentation.

Ms. Green watching someone's presentation.

Professor Sanchez reviewing a students work.
Friday, June 17, 2011
The Aquatotter is Over!
School Year is Long Over and I finally have time to post things, from all of my projects. The main focus of this post is the Aquatotter. Long Story short. We floated!!!! Despite the fact, we had no deck to speak of and broom as oars, we did it. I made a short movie describing the process, and I'll add the pictures of us underneath it.
The Construction
We got off to a rocky start. Our original material for construction was bamboo. I had visions of 1 1/2" diameter bamboo rods tied together and holding the bottles and keeping us afloat. Unfortunately, our bamboo suppply was less than adequate, so we had to supply the other team with money to secure wood and additional supplies, in order to construct it. This process is detailed a bit in the slide show.
The Bottles
Our primary flotation objects, we needed a lot to support our weight. Many other teams used tires, or floaters, but we stuck with the bottles. Collecting them all was one of the hardest parts of this assignment and figuring out how many we would need was also an issue. Since we had more than one kind of bottle, I had to find out how much each bottle type would carry, then count each bottle type. I will be including these calculations on a different post. I'll just say that i doubled the amount we would need to float, because we want to be above the water, not on the surface of the water.
Here's the Poster we used to raise awareness.

The other teams craft did technically float, but due to the narrowness of the craft, kept wobbling from side to side until it eventually, tilted over.
The Construction
We got off to a rocky start. Our original material for construction was bamboo. I had visions of 1 1/2" diameter bamboo rods tied together and holding the bottles and keeping us afloat. Unfortunately, our bamboo suppply was less than adequate, so we had to supply the other team with money to secure wood and additional supplies, in order to construct it. This process is detailed a bit in the slide show.
The Bottles
Our primary flotation objects, we needed a lot to support our weight. Many other teams used tires, or floaters, but we stuck with the bottles. Collecting them all was one of the hardest parts of this assignment and figuring out how many we would need was also an issue. Since we had more than one kind of bottle, I had to find out how much each bottle type would carry, then count each bottle type. I will be including these calculations on a different post. I'll just say that i doubled the amount we would need to float, because we want to be above the water, not on the surface of the water.
Here's the Poster we used to raise awareness.

The other teams craft did technically float, but due to the narrowness of the craft, kept wobbling from side to side until it eventually, tilted over.
Here is the video made by my group member TC, for our final presentation.
We succeeded, despite great difficulties, and most important of all, we floated!!!
Thursday, March 24, 2011
The Aquatotter is Coming........
So this will be the beginning of my first Project Series. The name of this project is the Aquatotter, and I will put the project guidelines in my next post. It is generally a floating boat/raft/thingy that is supposed to be able to float on the water, exchange crews, and go back to the dock. We are supposed to use mainly Reclaimed materials, like plastic bottles, cardboard, found wood, or anything generally that we didn't pay for. I think this is going to be a fun project, and I'm bursting at the seams with ideas already. Here's a link to previous year's Aquatotter adventures.
The first portion of the project, the anchor has been completed, and I shall have pictures up of the final thing in a couple of days. It went pretty well, and I believe our anchor fulfills all of the criteria established by the professor. Here are pictures of the original design which contained the initials of all the people who were in our group at the time. For the record, my group currently consists of RM (me), TC, RB, and EC. Since TC was a later addition to our group his initials didn't get on the anchor, but he helped with the lab report, so it's all good.


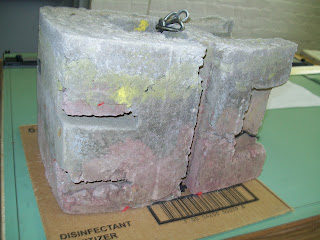

The first portion of the project, the anchor has been completed, and I shall have pictures up of the final thing in a couple of days. It went pretty well, and I believe our anchor fulfills all of the criteria established by the professor. Here are pictures of the original design which contained the initials of all the people who were in our group at the time. For the record, my group currently consists of RM (me), TC, RB, and EC. Since TC was a later addition to our group his initials didn't get on the anchor, but he helped with the lab report, so it's all good.


I did the anchor design in Google Sketchup. The anchor came out a bit rounded on the sides because of expansion, but otherwise came out as designed. We added fabric in between the layers of concrete for reinforcement, and a chain was added to pull it up by. There is also a hole in the center in case the chain breaks. Yellow and Red paint were used as colorant as well as red yarn. We emptied the whole bottle of yellow paint and the cement was eating it like m&ms but it showed up in the end, ditto with the red.

The R, with the chain coming out for securing and hoisting the anchor. There's also the hole in the center in case the chain breaks.

One of my group members giving an idea of scale.

The black stuff is the fabric reinforcement that we used. We were happy that we saw some color differentiation at the end of the day, because the cement was straight gray last time we saw it. You can see bits of the red and yellow paints we put in there.

The E/M & C, which came out pretty well considering that part of the E/M support collapsed while we were putting the cement in. More color visibility from this side.

Finally the B shape, where you can see the red yarn we put in. It turned out looking like red veins, which was an unexpected bonus.
So all in all, our anchor was a success. Its definitely heavy enough for the project requirements, the color is visible and we have 2 things to secure it with (the chain and the hole) when we get out on the water. And its light enough for one person to carry. Here's one of my group members describing our anchor.
I went to Ben Franklin's Art Supply mentioned in my earlier blog to grab some supplies for the coming project. It was a short trip, I only bought wax candles for sealing the plastic bottles we are collecting and some sketch paper for a different project. I went to 7 eleven afterward to get a pack of matches. You can get a whole lot for $1.19. My next post will be about the plastic bottles and the sealing process. Stay tuned.
Subscribe to:
Posts (Atom)